Tables are often used to group important data, for example, for a recap of sales of goods at the end of the month. The table format, which only consists of rows and columns, of course, makes it easier for us to read a report. In this regard, this page will share tips on how to easily create tables in Microsoft Excel and is very suitable for beginners or those who are new to this Microsoft data processing program. Well, create a table in Excel to make it neat and look more professional. You can give color to the Excel table, especially in the header or table head. More than that, in making tables in Microsoft Excel, the problem of choosing a style must also be considered by adjusting to the existing document format.
Apart from that, editing a table in Excel is also very practical. You can simply thicken the line or table border as you wish. Well, to maximize the creation of a table on a Microsoft Excel worksheet, it is a good idea to do it on a laptop or computer. As a result, the android phone is not ideal, and the interface is too small. Let's get right to it and show you how to make a table in Excel with Windows users.
Steps to Create a Table in Microsoft Excel
A few tips to quickly start the process of creating a table in Excel, especially if you need it in large quantities, are by copying the Excel table. Without having to start from scratch, you just need to move the data into the Excel table.
Creating Plain Excel Tables
our first tutorial will try to create a table that is commonly used by many Microsoft Excel users, namely by bolding the lines on the table. The method is very simple and easy to follow, especially for those of you who are new to this data processing application.
1. Open the Microsoft Excel worksheet on your computer or laptop.
2. Enter all the required data when you are finished. Please select all of them with the cursor or press the Ctrl+A keys on the keyboard.
3. Enter the Font category, then open the Bottom Border dropdown menu, then select All Borders to create a line on the table.
4. Well, next to set the table title or header. You can select it using the cursor, then you select Merge & Center to unite rows and columns into one cell.
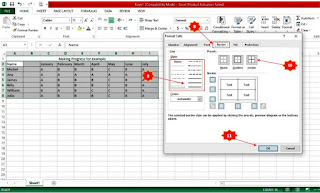
5. The next step is to thicken the table lines to have a neat and attractive appearance. You open the Bottom Borders dropdown menu and select the More Borders option.
6. Well, after the Format Cells appear, you go to the Border menu tab. In the Line Style section, select the thickest line. If you want to make it more formal, from the Presets section, you can choose Inside and Outline.
7. Then all the lines inside and outside the table will be bolded. You can check them in the sample border-box below.


