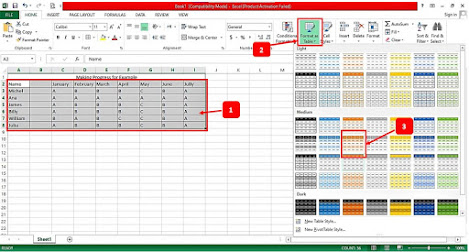
Change the appearance of the table style to be cooler and more stylish with the combination of the Format As Table feature and the Borders feature for a more professional blend of table styles, especially for those of you who want to present in public.
- As before, we first select the data we want to enter into the table.
- After that, you open the Format As Table dropdown menu, then select a style or table style according to your taste. Here, I choose Gold, Table Style Medium 12.
- On the Format As Table pop-up menu, check the My table has headers option. This option instructs Excel to create a header based on the format of our data, so the result is not a column 1,2,3, and so on.
- Don't forget to click OK to confirm it.
- To make the table better, we need to edit or edit it. Please select all of them and open the Bottom Borders dropdown menu, then select More Borders.
- On the Format Cells pop-up menu, go to the Border tab, then select the type of line, such as dashed, solid, double, and others.
- If you have entered the Presets section, click on the two boxes, namely Outline and Inside, so that all the lines on the table can change their style.
- Confirm the setting by pressing the OK button.
- The result is very satisfying. The Excel table looks neater and easier to read because there is a filter function. 👍
Thank you everyone for visiting my blog and waiting for the next update. Bye Byeeeeee... :) :) :)


